Wikipedia, the source of sometimes-accurate knowledge, defines IoT as: The Internet of Things (IoT) is the interconnection of uniquely identifiable embedded computing devices within the existing Internet infrastructure. Typically, IoT is expected to offer advanced connectivity of devices, systems, and services that goes beyond machine-to-machine communications (M2M) and covers a variety of protocols, domains, and applications.[1] The interconnection of these embedded devices (including smart objects), is expected to usher in automation in nearly all fields, while also enabling advanced applications like a Smart Grid
Introduction
Today, most people think of Lync and Skype as tools for Unified Communications – Instant Messaging, Audio and Video conferencing, Application Sharing and
in some instances telephony solutions.
Lync (and soon Skype for Business, the next version of Lync) can also be used as the end-point for receiving and processing a wide range of
modalities, including Instant Messaging.
Instant Messaging is a simple and effective means for receiving alerts, notifications and information, and has a number of benefits over traditional
methods.
|
Modality
|
Compared to
|
Benefits
|
|
IM
|
Email
|
Instant, in-your-face popup or toast notification
|
|
IM
|
SMS
|
Lower cost (IM is effectively free) and more reliable (IM can fail over to Email or SMS in the case an end-user is not online)
|
How important is IoT in the future? A video from fw:Thinking
It is predicted that by 2020, there will be 50 billion devices connected to the Internet. In this video from Fw:Thinking, Jonathan Strickland takes us on a tour
through a living room of the future to see how this "Internet of Things" will impact our daily lives.
Today, we are seeing more and more devices being connected to the internet – from Refrigerators to Cars, Televisions to entire Smart Homes.
What is this all about?
This article demonstrates how to use Lync as an endpoint for monitoring hardware and devices - in this instance the Gadgeteer Fez Spider board with a Gas Sensor.
The purpose is to provide a basic overview of the steps required to build a prototype board, connect the modules, and implement a small amount of C# code to send the output via Microsoft Lync or Skype for Business.
So how does IoT and Lync fit together?
By using one of Lync’s built-in or 3rd party API’s, it’s surprisingly easy to use Lync as a notification and messaging platform for physical
hardware and IoT devices.

Hardware Platform
 For this article, I’m using the Fez Spider, from GHI Electronics. The Fez runs the .Net Micro Framework 4.3, which is an open source framework supported by
Microsoft’s Open Technologies group.
For this article, I’m using the Fez Spider, from GHI Electronics. The Fez runs the .Net Micro Framework 4.3, which is an open source framework supported by
Microsoft’s Open Technologies group.
What can we monitor?
The .Net Gadgeteer supports a huge range of sensors and modules, all of which can be controlled by a few lines of C# or VB code. Some of the sensor modules
available are listed below.
|
Component
|
Description
|
|
LightSense Module
|
Measures light intensity
|
|
Pulse Oximeter Module
|
Non-invasive measurement instrument indirectly monitors heart rate & changes in blood
|
|
Accelerometer Module
|
Measures acceleration forces
|
|
Barometer Module
|
Accurate pressure & temperature data
|
|
Compass Module
|
3-axis magneto-resistive type sensor with I²C interface
|
|
Distance US3 Module
|
Ultrasonic sensors send a sound pulse and measure the time it took for the sound to echo back to determine the distance from the reflecting
object.
|
|
Current Module
|
Non-Invasive Current transformer with current turn ratio of 1800:1
|
|
Gyro Module
|
WITH complete 3-axis angular rate sensor & I²C interface
|
|
Keypad KP16 Module
|
Quickly adds numerical entry to any Gadgeteer project.
|
|
Moisture Module
|
Can detect moisture of soil or detect water around sensor
|
|
Potentiometer Module
|
Used for measuring position or controlling levels
|
|
Pulse Count Module
|
Offers a quick and easy way to add any rotary encoder, by connecting signals A and B. It can also be used as a pulse counter, such as when
using flow sensors.
|
|
OBD II Module
|
Allows communication with OBDII-supported vehicle; reads statistics like RPM, speed, fuel level, etc.
|
|
PIR Module
|
Passive IR sensor used to detect motion in module's field of view
|
|
Reflector R3 Module
|
A Reflector Module with 3 infrared reflective sensors. This is used to detect white vs black surfaces.
|
|
Rotary H1 Module
|
Includes a hardware decoder chip that does all the decoding internally. A developer will simply read a number, that increments with CW
rotation and decrements with CCW rotation.
|
|
Serial Camera L1 Module
|
Stream JPEG images
|
|
Temperature & Humidity Module
|
This Module was equipped with a SHT1x sensor, which measures relative humidity and temperature, and communicates with the processor via a
2-wire serial interface.
|
|
Touch C8 Module
|
Capacitive-controller senses a finger touch through the finger's capacitance. Touch can be detected even if the module is mounted behind
thin surfaces, like acrylic sheets. The module includes an eight-pad wheel, three buttons and even has proximity sensing, to detect when a
finger is coming closer.
|
|
Touch L12 Module
|
Capacitive-controller senses a finger touch through the finger's capacitance. Touch can be detected even if the module is mounted behind
thin surfaces, like acrylic sheets. This module is a linear slide.
|
|
Current ACS712 Module
|
Uses isolated magnetic field to measure current, keeping mainboard safely isolated
|
|
GasSense Module
|
Detects gasses; comes bundled with MQ3--sensitive
to alcohol, ethanol, & smoke--which can be replaced
with any other 5V sensor with same standard pinout
|
|
Thermocouple Module
|
Uses MAX31855K chipset to read K-type thermocouple sensors, for reading extreme temperatures of -270 to +1372ºC; ships with 2-meter,
0-400ºC k-type thermocouple sensor & can also use any other K-type thermocouple sensor
|
|
ColorSense Module
|
Measures red, green, & blue colour intensity; includes 4 white LEDs controlled through provided drivers
|
Code Examples
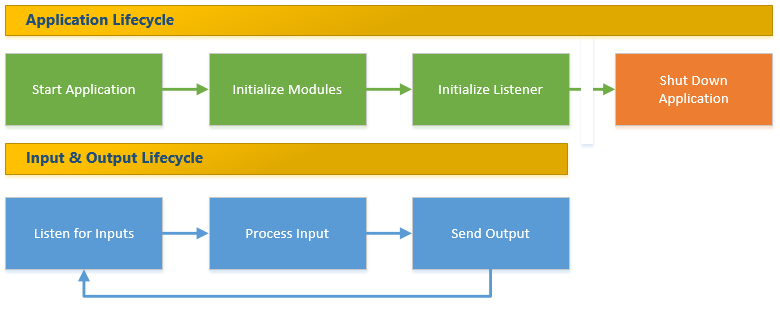
There are four simple steps for getting started .Net Gadgeteer.
-
Connect our modules
-
Connect to a network (wired or wirelessly)
-
Receive and process inputs from our modules
-
Send the output in a useful format, then wait for more inputs
Step 0 – Starting Off
There’s a great tutorial on MSDN showing how to get started with GHI’s FEZ Spider Kit and the .Net Gadgeteer framework
available here
. To avoid reinventing the wheel, below is a summary of the steps needed to build a basic IoT application.
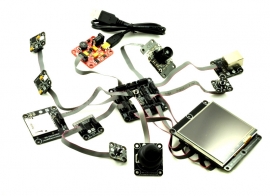
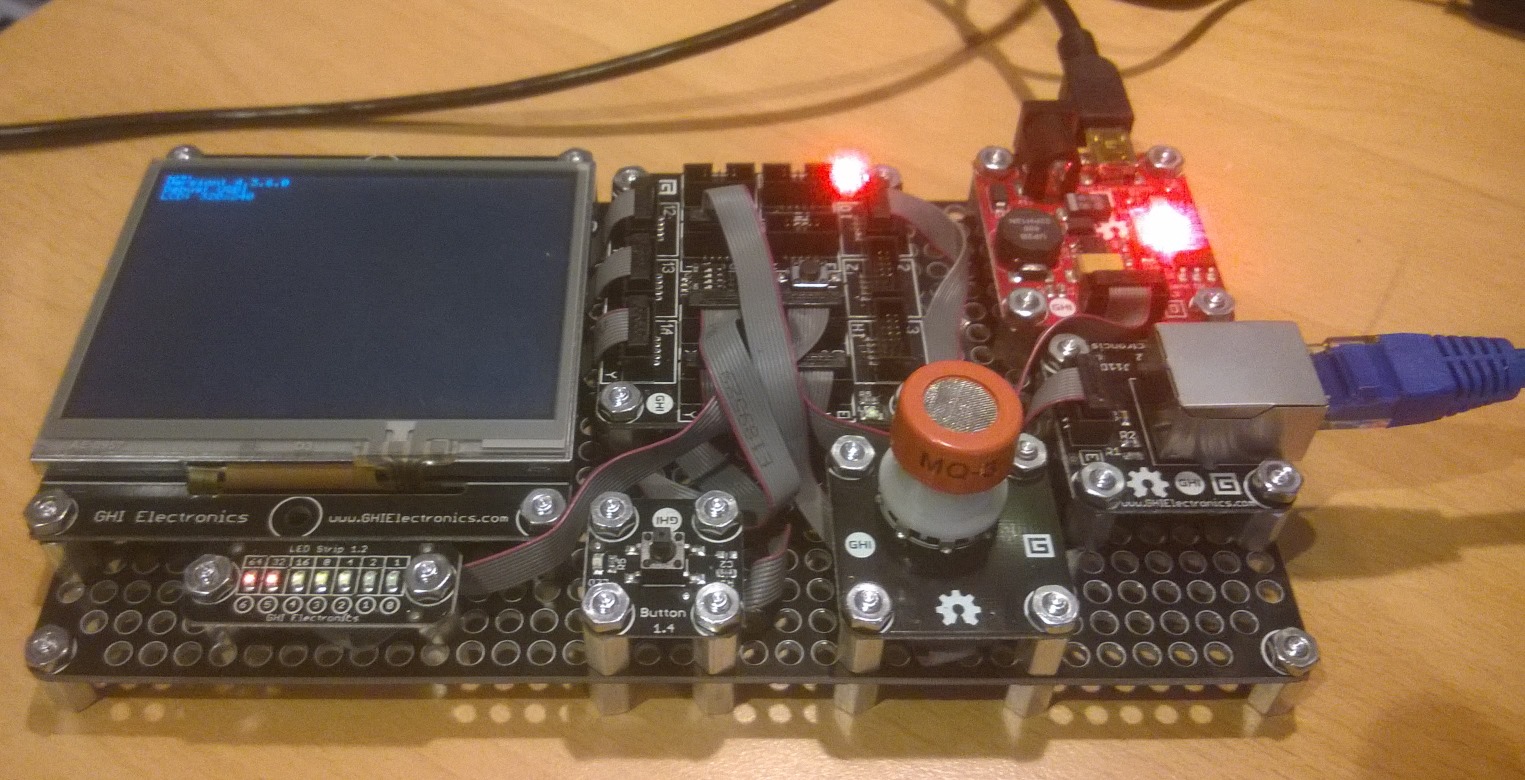
I've put together a basic Gadgeteer Fez Spider board with an Ethernet Module, T35 LCD Display (for debugging), Button Module, MQ-3 Gas Sendor Module and a LED Strip (for testing).
Step 1 – Connecting our Modules
With the .Net Gadgeteer framework installed, Visual Studio provides a simple method for connecting your modules using drag & drop. This is available
when you open the program.gadgeteer file.
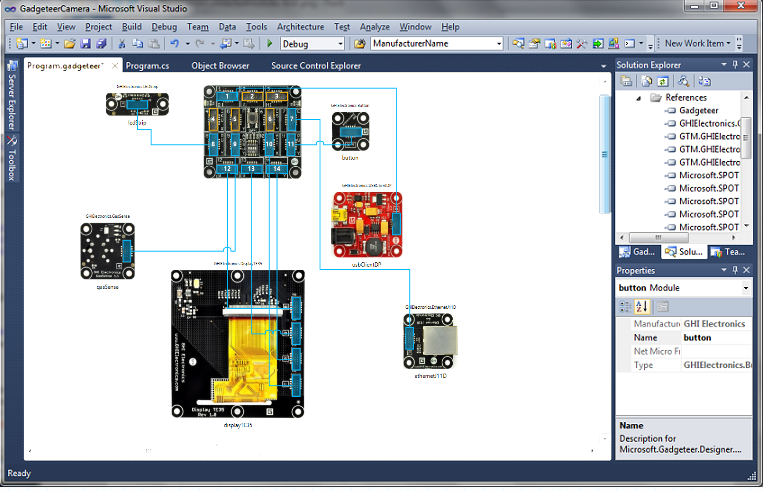
Once you have added all the modules you require, you simply right click on the canvas and select “Connect all Modules”. Visual Studio will
then automatically generate the code required to connect and initialize the modules and sensors you’ve added.
The code generated will look like this:
program.generated.cs
namespace GadgeteerApp5 {
    using Gadgeteer;
    using GTM = Gadgeteer.Modules;

    public partial class Program : Gadgeteer.Program {

        /// <summary>The Button module using socket 11 of the mainboard.</summary>
        private Gadgeteer.Modules.GHIElectronics.Button button;

        /// <summary>The Display TE35 module using sockets 14, 13, 12 and 10 of the mainboard.</summary>
        private Gadgeteer.Modules.GHIElectronics.DisplayTE35 displayTE35;

        /// <summary>The LED Strip module using socket 8 of the mainboard.</summary>
        private Gadgeteer.Modules.GHIElectronics.LEDStrip ledStrip;

        /// <summary>The USB Client DP module using socket 1 of the mainboard.</summary>
        private Gadgeteer.Modules.GHIElectronics.USBClientDP usbClientDP;

        /// <summary>The GasSense module using socket 9 of the mainboard.</summary>
        private Gadgeteer.Modules.GHIElectronics.GasSense gasSense;

        /// <summary>The Ethernet J11D module using socket 7 of the mainboard.</summary>
        private Gadgeteer.Modules.GHIElectronics.EthernetJ11D ethernetJ11D;

        /// <summary>This property provides access to the Mainboard API. This is normally not necessary for an end user program.</summary>
        protected new static GHIElectronics.Gadgeteer.FEZSpider Mainboard {
            get {
                return ((GHIElectronics.Gadgeteer.FEZSpider)(Gadgeteer.Program.Mainboard));
            }
            set {
                Gadgeteer.Program.Mainboard = value;
            }
        }

        /// <summary>This method runs automatically when the device is powered, and calls ProgramStarted.</summary>
        public static void Main() {
            // Important to initialize the Mainboard first
            Program.Mainboard = new GHIElectronics.Gadgeteer.FEZSpider();
            Program p = new Program();
            p.InitializeModules();
            p.ProgramStarted();
            // Starts Dispatcher
            p.Run();
        }

        private void InitializeModules() {
            this.button = new GTM.GHIElectronics.Button(11);
            this.displayTE35 = new GTM.GHIElectronics.DisplayTE35(14, 13, 12, 10);
            this.ledStrip = new GTM.GHIElectronics.LEDStrip(8);
            this.usbClientDP = new GTM.GHIElectronics.USBClientDP(1);
            this.gasSense = new GTM.GHIElectronics.GasSense(9);
            this.ethernetJ11D = new GTM.GHIElectronics.EthernetJ11D(7);
        }
    }
}
Step 2 – Connect to a Network
There are a number of modules available that provide network connectivity, including physical Ethernet and Wifi. I’ve chosen an Ethernet module for
simplicity, and allocated it a static IP address on my private network. Both modules fully support DHCP, which is more practical in a mobile environment.
Enabling a network connection is straight forward and follows a simple process.
Program.cs
, inside the ProgramStarted() method.
    // enable the network interface
    ethernetJ11D.NetworkInterface.Open();
    // create a collection of interfaces
    NetworkInterface[] networkInterfaces = NetworkInterface.GetAllNetworkInterfaces();
    // loop through each interface, assign an IP accordingly
    foreach (NetworkInterface ni in networkInterfaces)
    {
        if (ni.NetworkInterfaceType == NetworkInterfaceType.Ethernet)
        {
            ni.EnableStaticIP("x.x.x.x", "255.255.255.0", "y.y.y.y");
            ni.EnableStaticDns(new string[] { "8.8.8.8","8.8.4.4" });
        }
    }
Replace x.x.x.x and y.y.y.y with your local static IP address and default gateway respectively. I’ve chosen to use Google’s public DNS servers, however you can of course use your own.
To validate my network connection is active, I simply output the settings of the module to the debugging console.
    Debug.Print("Network settings:");
    Debug.Print("IP Address: " + netif[0].IPAddress);
    Debug.Print("Subnet Mask: " + netif[0].SubnetMask);
    Debug.Print("Default Getway: " + netif[0].GatewayAddress);
Error checking at this point would be a good idea!
Step 3 – Receive inputs from a sensor
In this example, I’m using the MQ-3 Gas Sensor module, which returns a value representing the level of methane in parts-per-million. This particular sensor
has a small heating element that should be enabled to increase accuracy of the reading, so we add the command in the ProgramStarted() method.
gasSense.HeatingElementEnabled = true;
The gasSense reference is created in the program.generated.cs file above.
Once initialized, we can then read the value periodically, simply by referencing the module as such:
this.gasSense.ReadProportion()
The ReadProportion() function returns a double (64-bit floating point value), which represents methane levels.
Step 3 – Periodic updates and processing
In a practical sense, we would want to check the values periodically. To do this, we need to implement a timer method within our application.
The Gadgeteer has its own timer class, which exposes the underlying .Net Micro Framework timer class. We can create a timer object as follows.
    // create a timer object that runs every 1/4 second (250ms)
    GT.Timer timer = new GT.Timer(250);

    // reference the method that the timer will call
    timer.Tick += timer_Tick;

    // start the timer ticking. :)
    timer.Start();
To simplify longer class references, the GT above refers to the Gadgeteer module that I’ve referenced in my class.
    using GT = Gadgeteer;
    using GTM = Gadgeteer.Modules;
We now need to create the timer_Tick() method that the timer is calling, every 250ms.
To avoid the console filling up with values every 250ms, I’m keeping track of the previous value, and only displaying an update if it changes. As the
heating element (see above) warms up, the values will be more accurate, so changes will slow down as the element readings approach their baseline.
// keep a record of the last reading
double last_gas_reading = 0;
void timer_Tick(GT.Timer timer)
    {
        // get the current value
        double current_reading = this.gasSense.ReadProportion();

        // Now we compare the current and previous readings. The readings generally return values with 4 decimal places, however I don’t need that level of
        //accuracy, so only care about the first 2 decimal places.
        //normally I would use Midpointrounding to round the double value, but it does not appear to have been implemented in the .Net Microframework. Instead I’m
        //using string formatting within the ToString function in C#. If anyone has a better way of doing this, please let me know!

        if (current_reading.ToString("F2") != last_gas_reading.ToString("F2"))
        {
            // the reading has changed, so update the previous reading in preparation for the next check.
            last_gas_reading = current_reading;

            // get the current time of day
            TimeSpan timespan = DateTime.Now.TimeOfDay;

            // display the current time and the current reading to the debug console.
            Debug.Print("Reading Changed at " + DateTime.Now.ToLocalTime() + " to " + current_reading.ToString("F2"));
        }
    }
This results in output such as that below in the debug console. We can see that the levels are increasing to around 0.56 which is my local baseline, and
then alternates from time to time.
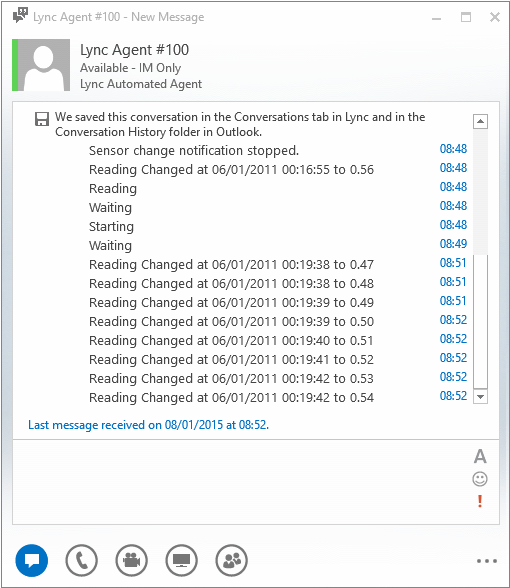
    Reading Changed at 06/01/2011 06:18:27 to 0.47
    Reading Changed at 06/01/2011 06:18:27 to 0.48
    Reading Changed at 06/01/2011 06:18:28 to 0.49
    Reading Changed at 06/01/2011 06:18:28 to 0.50
    Reading Changed at 06/01/2011 06:18:29 to 0.51
    Reading Changed at 06/01/2011 06:18:29 to 0.52
    Reading Changed at 06/01/2011 06:18:30 to 0.53
    Reading Changed at 06/01/2011 06:18:31 to 0.54
    Reading Changed at 06/01/2011 06:18:32 to 0.55
    Reading Changed at 06/01/2011 06:18:34 to 0.56
    Reading Changed at 06/01/2011 06:18:37 to 0.57
    Reading Changed at 06/01/2011 06:18:38 to 0.56
    Reading Changed at 06/01/2011 06:18:38 to 0.57
Step 4 – Send the Output
Aside from sending the results to the debug console, it would be far more useful to send the output as an IM to Lync – that way we have an alert presented
when the level reaches a value that you are concerned about.
Integration with Lync using UCWA
The Unified Communications Web API (UCWA), is a platform development created by Microsoft that exposes Instant Messaging and Presence capabilities of Lync.
This API can be used to send IMs from your backend server or device to a federated Lync client.
Learn more about using UCWA on the Lync Web Developer website.
Integration with Lync using Lync Agent
Integrating with Lync Agent is possibly the easiest method for sending instant messages from your IoT project – whether this be status updates (a button
was pushed) or frequent counters or metrics (temperature, etc.)
Lync Agent is a hosted SaaS that provides a simple API for delivering Lync and Skype messages. Check it out at http://www.lyncagent.com/
The simplest method is to use Lync Agent’s GUID-based HTTP API, allow for messages to be sent from a single HTTP POST. Here’s an example:
https://api.lyncagent.com/sendim?sender=GUID&recipient=GUID &message=<message>&priority=<priority>&subject=<subject>
|
Parameter
|
Description
|
|
sender
|
An Endpoint GUID representing the sender of the message, configured within the Lync Agent portal.
|
|
recipient
|
An Endpoint GUID representing the recipient of the message, configured within the Lync Agent portal.
|
|
message
|
A string of text that will be sent to the recipient(s). The string can be either plaint-text or HTML formatted. HTML must be URLencoded to
avoid transmission errors. RTF is not currently supported.
|
|
subject
|
A string of text that is used as the subject for the Instant Message. This string is displayed on the client in the 'Toast' notification
window.
|
|
priority
|
One of the following priority settings: "Low", "Normal", "High"
|
|
dnmf
|
A string flag representing whether the POST or GET has been initiated from within the .Net Micro Framework. This allows for POSTs and GETs
without the need for an SSL wrapper.
|
To send a HTTP POST from your Gadgeteer project, we can use the HTTPHelper class and the CreateHttpPostRequest() method.
In my example project, I’ve created a wrapper method to simplify the process of sending a HTTP POST to Lync Agent.
void sendhttppost(string message)
    {
    // create the full URL that we will post to api.lyncagent.com
    string url = "http://api.lyncagent.com/sendim?dnmf=yes&sender=xxxx&recipient=yyyy&message=" + message + "&priority=Normal&subject=NetMF";
    Debug.Print("POST to :" + url);
    POSTContent emptyPost = new POSTContent();
    var req = HttpHelper.CreateHttpPostRequest(url, emptyPost, "text/plain");

    // The request is an Async method, so we need to handle the results once the action has been completed. To do this, we reference a subsequent method.
    req.ResponseReceived += new HttpRequest.ResponseHandler(req_ResponseReceived);
    req.SendRequest();
    Debug.Print("POST complete.");
    }

void req_ResponseReceived(HttpRequest sender, HttpResponse response)
    {
    // check if a HTTP status of 200 was returned. 200 is an ‘OK’ result.
    if (response.StatusCode != "200")
        {
        Debug.Print("HTTP POST Failed");
        Debug.Print(response.StatusCode);
        }
    else
        {
        Debug.Print("HTTP OK");
        }
    }
xxxx and yyyy represent the sender and recipient GUIDs created within the Lync Agent portal, and are used to tell the API whom to send the message, and who
it should be from.
Small disclaimer:
I built Lync Agent, so I am a little biased… :-)
The Resulting Output
The sensor values retrieved above from the Gas Sensor module as are passed to Lync in realtime via the API calls.
What's next? Using Lync to Control Devices
Can you imagine turning this around, and using Lync to control actual devices? In my next article, I'll describe just how - how to turn physical devices on and off, and control mechanical actions, from a Lync client.
Useful Links
GHI Electronics
– Fez Spider
.Net Micro Framework
Lync Agent
Lync Development Overview
Tags
IoT,
Lync,
Skype,
Skype for Business,
Internet of Things,
Gadgeteer,
Netduino,
Arduino